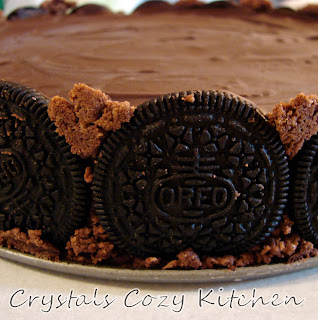
So I made my own birthday cake... I've actually done this before - when I was in college I made one as well (for my 21st birthday actually). When one of my friends found out I made the cake myself I was told I couldn't make my own birthday cake (this was almost as a lecture.) I'd never heard that rule before and frankly I think I made the one this year just to spite that comment (plus I didn't technically make it ON my birthday since it had to cool overnight!) Oh, and also because I love to cook and because I absolutely adore cheesecake. The cake I made 7 years ago was a caramel apple cheesecake, and yes it was delicious! The cake I made this year - that's right - Triple Chocolate Cheesecake is SOOOOO GOOD! Really, you have to try it! It is also very rich - so I usually cut it into at least 16 slices. I have also made it in cupcake pans - definitely the way to go when you want to make sure that quite a few people get to try it!
Crust:
To start - you'll need 2 cups cookie crumbs. Now I've used a few different types of cookies for these crusts. I have used Chocolate Wafer cookies, Chocolate Wafers (you know like Vanilla Wafers only chocolate), chocolate graham crackers and oreo cookies (with the fillings removed.) I'm here to tell you that you should not under any circumstances us chocolate wafer cookies for the crust (unless you've tried it and liked it, but none of my taste testers thought it tasted very good) - the fillings in the cookies just do not help the taste. I'd say the best would be graham crackers or Chocolate Wafers (the Vanilla Wafers kind.) If you decide to make cupcakes, just place a Chocolate Wafer in each muffin tin and you don't have to form each individual crust - trust me it's pretty good that way and a heck of a lot easier!
This crust was the failed Chocolate Wafer Cookie crust, but pretend it is something good like chocolate graham crackers! To your 2 cups cookie crumbs add 2 tbsp sugar or to taste - come on you can't tell me you don't snitch some of the crust mixture as you're making it! I know I sure do!
Also add 1/4 plus 1 Tbsp melted butter.
Mix it all together.
Press into a springform pan and cover the bottom and up the sides.
When I made the crust this time I had the brilliant idea to add one more aspect of chocolate to this cake - I put a layer of Oreo cookies (centers removed) around the bottom of the pan after I put the crust in it. I actually put a layer of cookies around the sides before I put the crust in.
You can see the ones on the side better in this shot. I then tried to pack in some crust mixture to keep them in place and help the crust have an even top - BAD idea! It made it look not so great. It would have looked better if I would have just left the cookies as they were.
Now that the cookies are in place it's time to bake this crust.
Bake at 350 degrees for 10 minutes. And please put the pan on a cookie sheet! Trust me on this one - you don't want butter oozing out of the pan and onto the bottom of your stove - smoky stuff. Luckily I remembered this time and didn't have to deal with that. ;)
Filling
First melt 1/4 cup chocolate chips (I used semi-sweet, but you can also use dark or milk if you prefer.)
Then add 1/4 cup heavy whipping cream (at room temperature.) Honestly as you make this don't think about the number of calories that go into it!
Mix until combined.
Set aside - you will be using this, but not until the last step of the filling - it needs to cool a bit ;).
Next, place 3 packages (8 oz each) of cream cheese in a bowl, make sure the cream cheese is softened. Beat for about a minute. I typically use 2 pkgs of cream cheese and 1 pkg of the lower fat cream cheese... if you use all lower fat cream cheese it doesn't turn out quite the same.
Then add 1 cup sugar.
Mix until combined.
Add 1/3 cup baking cocoa. It's getting good now - we're at the chocolate! Next time I make this I'm going to use dark baking cocoa. I want to know if it makes that much of a difference.
Mix until combined.
Go ahead and taste it now if you want! After we add the next ingredients - I wouldn't suggest snitching any more!
Add an egg, mix to combine. I suggest using a prep bowl or something similar to crack the egg into so you don't have to worry about egg shells in the cheesecake. That just wouldn't be cool.
Add a second egg, mix to combine.
Add a third egg.
We're all done adding eggs, mix until smooth.
Now for the second to last part -
Add 1 tsp of vanilla.
Mix just until combined.
Doesn't it just look delicious! But wait, we're not done yet!
Remember that reserved chocolate and cream mixture? How could you forget - right? Add it now.
Mix on low speed until combined.
Now it's ready to bake - well sort of.
Grab the pan with the crust in it.
Pour in the cream cheese filling.
See that rubber spatula - that's to make sure as much of this goes into the pan as possible.
I also use the spatula to help even out the batter.
It's now ready to go in the oven.
Bake at 325 for 45-50 minutes.
Doesn't this just look so delicious?
It may be tempting to eat it right now, but trust me - hot cheesecake is not the best! Be patient.
Let this cool for about an hour. (No you don't get to eat it in an hour, just apply another layer of chocolate!)
Topping:
To start you'll need 1 and 1/2 cups chocolate chips - Before I really liked dark chocolate I'd use 3/4 cup semi-sweet and 3/4 cup milk chocolate chips.
However this time I used 1/2 cup dark and 1 cup semi-sweet. I would have used 3/4 cup of each but I only had 1/2 cup dark...
Add 1/4 cup cream (room temperature)
Mix until combined.
Looks so good, eh?
Go grab the cooled cheesecake. If you put the topping on the cheesecake right out of the oven it will bubble.
Pour on the topping.
Smooth it out. Let cool for 8 hours or overnight. Be sure to cover it, but be careful the cover doesn't touch the topping or it will leave funky imprints. Unless you don't mind them, then it'll be fine.
After it's cooled, it's time to remove it from the fridge and eat it.
Remember earlier when I said, "I then tried to pack in some crust mixture to keep them in place and help the crust have an even top - BAD idea! It made it look not so great. It would have looked better if I would have just left the cookies as they were."
Now you can see what I mean... It would have looked so much better with just the Oreos.
I actually used the oreos as makers to cut the cake.
It worked great. They were the perfect size.
This has 4 layers of chocolate, but I've never done the oreo layer before - I would suggest doing it unless you use Oreos to make the crust.
Another thing I'd suggest is whipping cream. Yum. But not just any whipping cream - That's right - chocolate whipping cream. I'll have to perfect how I made this before I can share how to make it, though.
Enjoy!


Oh my, this looks delicious! My son saw the picture over my shoulder and has already asked me to make this for him. Good thing you have such a great tutorial!
ReplyDeleteOh Crystal! I wish you were my neighbor so I could try some of these yummy things you make. Then again, it is probably good you are not, at least for my waste line. I'm using self control at this time and will not jump in my car right now to get the ingredients to make this. That doesn't mean I'll be so strong on my next really stressful day. :)
ReplyDeleteThat looks so good! Chocolate and Cheesecake what a perfect combination. Happy Birthday!
ReplyDeleteYum!
ReplyDeleteOh my chocolate heart attack here I come!! I can't wait to try this recipe.
ReplyDeleteWhere do you live???!!
ReplyDeleteWow, that looks amazing! Yum!
ReplyDeleteThat looks so very good!!
ReplyDeletetriple chocolate cheesecake, yummy, perfect for my sweet tooth
ReplyDelete