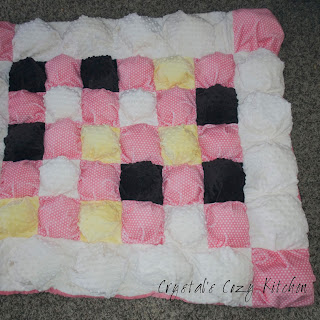
I decided to try to make a puff quilt. I had heard that many people only make one because they are a headache to make. But I decided to do it anyway... I read a bunch of tutorials on how to make one and I could see why people would say one was enough, but once I get an idea I have to run with it. However, as I made my puff quilt I realized there was an easier way to make it than ALL of the tutorials I had read! So I decided I had to share how to make it because I'm all about helping make life easier for everybody!
This tutorial does not include making individual pillows or hand sewing the backs of each pillow closed! It involves sewing each square into rows and then two rows together before stuffing, so you only have to deal with the bulk of the stuffed pillows for 8 seams - plus adding the border (and they're long so you have plenty of quilt to help guide it through)! That's why I call this the Sanity Saving Puff Quilt Tutorial.
Sanity Saving Puff Quilt Tutorial (How to make a Puff Quilt)
Materials Needed (toddler size):
30-8 inch squares coordinating fabric (I used minky and it is super soft!)
30-6 inch squares any fabric (this will be on the inside of the quilt so you can use anything - muslin, etc. Just make sure that if it is colored it doesn't show through the top fabric!)
Fiberfil
Extra coordinating fabric for the border - 4 strips 30 x 9 and 4 - 9 inch squares.
Extra fabric for underside of border - 2 strips about 8x26 inches (you'll want to measure the finished middle to be sure of the exact size) and 2 strips about 8x42 (again you'll measure during the process to make sure it's the right size)
1.5 yards for the back (will have a bit left over)
And thread, sewing machine, etc.
We'll start with the 8 inch squares and the 6.5 inch squares.
Match them together on one corner with the smaller square on the wrong side of the 8 inch fabric. At the sewing machine, start sewing, but about half way through, make a bunch. I used a 3/8 inch seam allowance for these.
Make sure the bunch is large enough that the bottom ends of the squares are now even.
Repeat on 2 more sides. Be sure to leave one side open.
Repeat for each of the 30 squares.
As I got going I made sure to put a pin in the middle of the fabric so I would remember to bunch them up.
I won't say how many seams I had to rip before I decided this was a good idea.
Once you get to the pin, just remove and make the bunch.
You'll thank me for this tip when you're not ripping seams because you're so into sewing that you forget what you're suppose to be doing ;).
Because I used minky fabric, I left a bit of a gap at the end and as I sewed it stretched to become even at the end. If you are using all cotton you won't have to make that adjustment, just line them up so the squares match perfectly.
Look at how great those squares matched up!
Once you have sewn all three edges on all 30 squares, lay them out in the pattern you want for the end quilt.
Then turn the openings so the first row points out, then the second row the openings face opposite. The first two rows should have the seams opposite the openings touching along the whole row.
Then the next two rows should look exactly like the first. The 3rd row the openings will face Row 2 and the 4th row openings will face row 5. If you're confused, keep reading - it should make sense in a minute!
Sew all the rows together. When sewing the rows together I used a 1/2 inch seam allowance so as not to show the original seam.
Then sew row 1 with row 2. Row 3 with row 4, and then row 5 with row 6.
What you'll have is 3 sewn strips that look like these with the openings facing out on either side.
Every tutorial I read before making this had you sew individual pillows (stuffed) together. This is so much easier. I had the idea after I'd laid them out before stuffing them and trust me - you'll thank me so much for this time saver!
Once you've sewn the 3 sets, stuff them, then sew the open ends closed.
Then this is the hardest part - sewing the stuffed rows together. Be sure to pin the squares so the seams nest and make sharp corners.
I had to pull this through my sewing machine and my hands were sore afterward - just a warning!
Once all the rows are sewn together, it's time to add the border! And I somehow missed making the border so hopefully the description makes sense, if not please ask for clarification.
Start by measuring the dimensions of the finished rows. Cut 2 strips of the underside fabric to equal the length (these will be the shorter measurement). Then sew them to 2 of the strips of coordinating fabric, making 4 bunches along the way - it does help to pin to have even spacing. Sew along the ends as well. Then sew 3 dividing seams down it. Stuff with fiberfil and sew closed. Add to opposite ends of the quilt.
Next, sew a 9 inch square onto each end of 2 of the strips of coordinating fabric. Measure the quilt and cut the 2 longer strips to equal the measurement. Sew the coordinating fabric to the underside fabric and repeat steps from above, making an additional poof square where the ends squares are. Sew finished border to the quilt.
To sew the backing on, measure quilt dimensions again. Cut backing fabric to meet it. Sew inside out leaving an opening to turn (about 1 foot or a bit larger, remember you're pulling all the stuffed quilt through it!)

Once flipped, pin opening closed and pin on either side of the border seam. Sew closed.
To sew together, we'll be stitching in the ditch, between the pins.
Here you can see the pins on the top side, where we'll be stitching. Stitch in the ditch to quilt the two layers together.
Here's what the seam looks like on the back.
And you're done!
Step back and admire the finished product.
And be thankful that you saved a bit of sanity by not sewing 30 individual pillows together and then sewing them into rows!
One bonus item you can do is sew a matching pillow. It's super easy - you'll just need 4 extra squares. I sewed all 4 together and then stuffed them and then sewed closed. Then I put the back on the same way as the quilt, but it was much easier since it was smaller!
I think it would be super cute with button in the middle!
I hope you enjoyed this tutorial on how to make an easier, sanity saving Puff Quilt.


No comments:
Post a Comment
I love to hear from you! Please leave a comment below. Because I want this space on the internet to be a happy space, any rude or degrading comments will not be published.